android:id="@+id/btnDate"
android:layout_width="match_parent"
android:layout_height="wrap_content"
android:layout_marginTop="@dimen/_10sdp"
android:background="@drawable/gray_corner"
android:drawableLeft="@drawable/ic_date"
android:drawablePadding="@dimen/_10sdp"
android:focusable="true"
android:hint="Date of Birth"
android:inputType="textEmailAddress"
android:isScrollContainer="true"
android:overScrollMode="always"
android:padding="@dimen/_10sdp"
android:scrollbarStyle="insideInset"
android:scrollbars="vertical"
android:singleLine="false"
android:windowSoftInputMode="stateAlwaysVisible"></TextView>
</LinearLayout>
In Java file
public class LoginActivity extends AppCompatActivity {
TextView btn_login;
TextView btnDate;
Button selectDate;
TextView date;
private int Year, Month, Day, mHour, mMinute;
DatePickerDialog datePickerDialog;
int year;
int month;
int dayOfMonth;
Calendar calendar;
protected void onCreate(Bundle savedInstanceState) {
super.onCreate(savedInstanceState);
setContentView(R.layout.activity_login);
btnDate = findViewById(R.id.btnDate);
btnDate.setOnClickListener(new View.OnClickListener() {
@Override public void onClick(View v) {
final java.util.Calendar c = java.util.Calendar.getInstance();
int mYear = c.get(java.util.Calendar.YEAR); // current year
int mMonth = c.get(java.util.Calendar.MONTH); // current month
int mDay = c.get(java.util.Calendar.DAY_OF_MONTH); // current day
datePickerDialog = new DatePickerDialog(LoginActivity.this,
new DatePickerDialog.OnDateSetListener() {
@Override
public void onDateSet(DatePicker view, int year,
int monthOfYear, int dayOfMonth) {
btnDate.setText(dayOfMonth + "-" + (monthOfYear + 1) + "-" + year);
}
}, mYear, mMonth, mDay);
datePickerDialog.getDatePicker().setMinDate(System.currentTimeMillis() - 1000);
datePickerDialog.show();
}
});
}
}


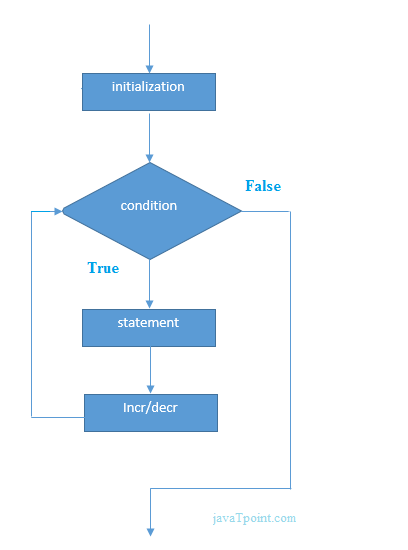 loop flowchart